Ideas
A Little Cloth from a Cardboard Box: Your First Mini Weaving
Over, under, turn back. A small loom makes cloth construction visible—and gives you a useful way to understand why the edges keep pulling inward.
By Hobby-ist Editorial Team · 5 min read · October 20, 2026
In this story
A cardboard box usually disappears after its contents have found a home. Cut a few notches into a piece of it, stretch some thread across the front, and the packaging becomes a tool. The first few rows look slight. Then a patch of cloth appears, held together by a pattern simple enough to follow with your eyes.
For this first piece, aim for a plain-weave mat roughly the size of a cup mat. The final dimensions will depend on your yarn and tension. Use it for an ordinary cup or display rather than a hot pan, and let the first attempt take an unhurried session or two. The satisfying moment is when the loose rows begin to behave like cloth.
Make a loom that keeps its shape
Use stiff cardboard about 18 × 24cm, a ruler, pencil, scissors, tape, a blunt tapestry needle and two colors of medium-weight yarn. Smooth cotton is a useful starting material. For the vertical support threads, choose a firm, non-fuzzy cotton that does not stretch easily. Our planning allowance is about 8m for this warp and 6–8m of weaving yarn, including generous ends; actual consumption varies.
On both short edges, mark 14 matching points 7mm apart, centered across the board. That gives about 9cm between the outermost threads. Cut shallow notches about 5mm deep. Keep the cuts aligned and stop before they weaken the edge. Children need appropriate help with cutting. If the cardboard bows when you add thread, use a stronger piece rather than trying to weave around a bent frame.
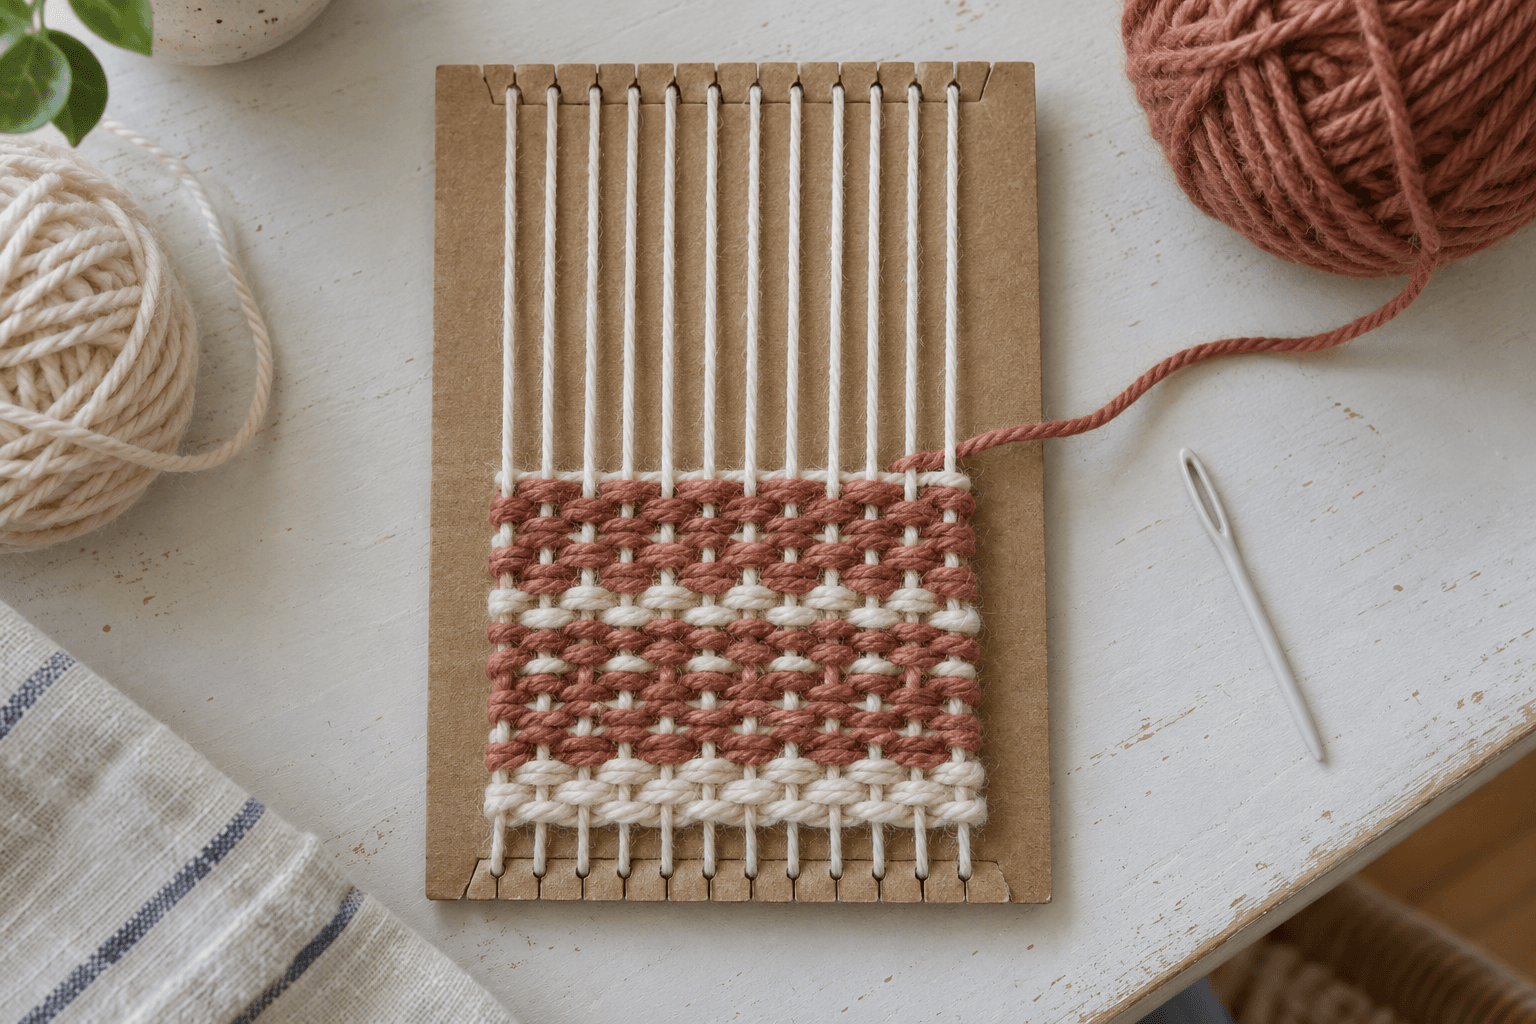
Tape the warp’s starting tail to the back. Bring it through the first top notch, down the front into the matching bottom notch, around the back and up to the next top notch. Continue until you have 14 vertical strands on the front; secure the final tail on the back. Keep the tension firm enough to separate the strands, but not so tight that the board curves. Leave the back threads accessible for finishing.
There is room to vary this simple tool later. The Oakland Museum activity uses a wider-spaced yarn-and-fabric approach, and the Hirshhorn activity offers another setup. For now, keep to the small practice layout here so you can watch one thing clearly: how the thread turns at an edge.
Watch the second row do the important work
Cut a manageable 60–80cm length of weaving yarn and thread the blunt needle. Begin about 4cm above the bottom edge of the board, leaving a tail of about 10cm at the side. Pass over the first warp strand, under the second, over the third and so on. With 14 strands, the first row finishes under the last one.
Turn around the outer warp and reverse the crossings. Where the first row went under a strand, the returning row goes over. Read from the left, the rows alternate over–under–over–under and under–over–under–over. After a few passes, the pattern becomes visible; this is the moment separate strands begin holding one another in place.
Before settling each row, leave the yarn in a shallow upward arc. Ease it down with your fingers or a fork used gently as a comb, distributing the slack across the width. Do not pull the strand straight and tight first. Aim for rows that sit together without crushing them into an unyielding ridge.
Keep the edges from becoming an hourglass
A narrowing edge is the loom’s most useful early message. Compare the working width with the bottom of the cloth. If it is drawing inward, undo a few rows while they are easy to remove, leave a fuller arc of yarn and turn more gently around each edge. You are making room for the thread to travel across the warp without pulling it into an hourglass.
For a striped sample, work a few rows in one color, then change. End at a side, leaving roughly 10cm to weave in later; start the new color with a similar tail. Continue the over-under pattern dictated by the preceding row, regardless of color. A new shade does not restart the structure. Keep the first project to broad stripes so you can see tension changes without managing many ends.
If a row misses a strand, unweave back to that point rather than sewing it down afterward. If everything is sliding loosely, settle the rows a little closer together. If the needle is difficult to pass, work with a shorter yarn length and check whether the warp or packed cloth has become too tight. These symptoms call for different adjustments, not simply more force.
Finish before you cut everything free
Stop when the woven area is roughly 9–10cm tall, leaving ample unwoven warp at the top and bottom. Weave each horizontal yarn tail into the back of neighboring rows, changing direction so it does not simply slide straight out. Do this while the board still supports the cloth. The University of Alberta weaving activity provides further context for a removable woven piece and finishing.
Turn the board over carefully. Cut the back warp strands near the middle of the board, then lift the front piece off while keeping its top and bottom ends organized. Tie adjacent warp ends in pairs close to the woven edge—seven pairs on each end for this 14-strand setup. Keep the knots snug without drawing the whole edge into a bunch. Only then trim the fringe and inspect the horizontal tails.
Lay the mat flat and try an empty cup. If it rocks, look for a tight ridge or bunched edge; if a loose end slips, return to the finishing. A little unevenness can be part of a first piece, but the mat should feel settled before you trust it with a filled drink. This small test gives the object a job beyond looking finished.
Our leaf-embroidery evening explores thread on an existing fabric. This project shows the earlier step: making the fabric itself. If you prefer a hook and a portable continuous project, the first crochet project guide offers a useful comparison.
Next time you see a woven edge, you will know something about the choices inside it. A turn can pull too tightly; a row can leave just enough room; an end can find a secure path. A piece of packaging has helped you see how cloth is made.
Sources & verification
Information checked: 2026-10-20